Laser Collimator Comparo
(Various Reviews, Page 5)
By Ed Ting
Updated 1/06/00
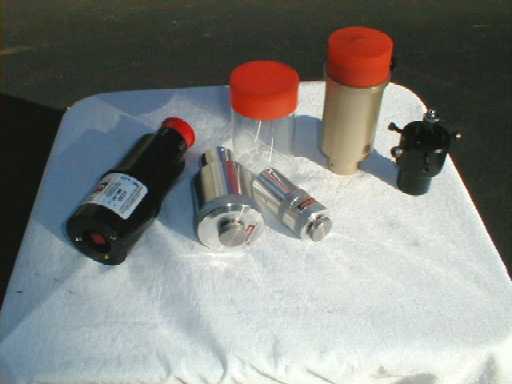 A bevy of laser collimators. From L to R:
LaserMax, 2" and 1.25" by Howie Glatter,
Astro Systems, 1.25" by The Telescope Warehouse
A bevy of laser collimators. From L to R:
LaserMax, 2" and 1.25" by Howie Glatter,
Astro Systems, 1.25" by The Telescope Warehouse
If you're the type that likes to read the end of a comparo first, I'll save
you some time. ALL of the higher-end laser collimators in this article
(the LaserMax, both of Howie Glatter's units, and the Astro Systems)
agreed with each other dead-on in my tests. I could have used any of
them to achieve pretty much the same results. So there. Saved you
a lot of time scrolling up and down this article, right?
Well, not really. As it turns out, final, landed accuracy is only one
factor that one can use to select a laser collimator. In fact, since
the lasers agreed with each other so well, accuracy may be one of
the LEAST important factors to consider. Intrigued? OK, now you'll
have to read the rest of this article...
Collimation
Collimation is, to many, the most fearful aspect of dealing with a
Newtonian. As a result, many observers, especially beginners,
never learn how well their optical systems can really perform.
Yet, accurate collimation is crucial for obtaining the best images out
of a telescope. At a recent star party, I ran across a beginner who
had just bought a Dobsonian from a major manufacturer. He wasted
no time in telling me how "disgusted" he was with it. Looking through
the eyepiece, I saw immediately that something was very, very wrong.
Pulling out the eyepiece, I saw that the diagonal was twisted so far
away from the focuser that it was amazing there any image at all.
Reaching into the front of the tube, I turned the diagonal towards
the eyepiece and then manually adjusted the secondary with an allen
wrench. All of this was done without any collimating tools whatsoever.
The images snapped into focus and brightened considerably. The guy
thought I was some kind of genius, but all I did was an approximate
collimation for him. Who knows how well the scope could have done
with an accurate collimation?
To Lase, or Not to Lase?
The way I see things, there are three levels to collimation. They are,
in increasing order of accuracy:
1) Any mechanical method not involving a laser
2) Using a "dot" style laser
3) Using a laser that projects a hologram or reticle
The last category is, of course, relatively new. I was curious to see
how the new hologram lasers compared to other, more traditional
methods of collimation. For these tests, I used sight tubes and
collimating eyepieces, along with the lasers, in the 10" EL Star-
master, a 6" homemade Dobsonian, and the 20" Obsession.
The Laser Collimators
The Astro Systems units ($125-$169) have been around for a while,
and represent the traditional, high quality "dot" style collimators.
They're well-made, in brass-colored aluminum, with a switch on top.
Older units have a large orange-colored cap that serves as the switch,
while the newer version has a black button on top. The "orange top"
versions spill out a tangle of wires whenever you take the cap off,
which is a bit of a nuisance. These Astro Systems collimators
work well, and are a bargain, especially on the used market.
From Howie Glatter in the Bronx comes an attractive pair of laser
collimators. They're nicely finished in aluminum, and very solidly
built. Of all the units I tested, Glatter's seemed the most rugged
and had the tightest fit in the focuser. The 1.25" ($100) is a "dot"
style unit, but the 2"/1.25" unit ($210) projects a reticle grid
pattern into your tube, and onto the wall in front of the tube. This
makes fine-tuning a pleasure. I never thought I'd hear myself say
this, but collimating is actually fun when you have a hologram-style
unit.
Also, I should make note that Howie upgrades his designs often. In
fact, the units I used back in November and December of 1999 have
already been changed a bit. Check with Glatter if you want the latest
scoop (links to all manufactuers are listed at the end of this page.)
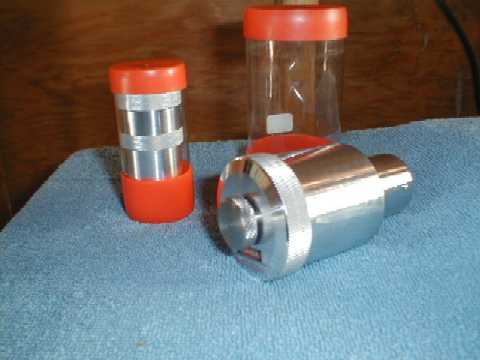 Rugged, and very accurate: Howie Glatter's lasers
I obtained one of each as review samples from Howie himself. These
collimators are activated by turning the hefty, stainless steel bolt
on top of the unit, which makes contact with an expensive CR123
battery inside the housing. Some thought that the use of the CR123
was a disadvantage compared to the others, which use plain AA batter-
ies. Luckily, prices on these CR123s have been dropping steadily over
the past few years.
The LaserMax is a beautifully-made collimator with a serious-looking
warning label on the side of the housing. In contrast to the rugged
but somewhat homemade look of Glatter's units, the LaserMax is the
most refined-looking collimator I've ever seen. There's a red push
button on the top, a yellow LED indicator, and a lens cap for the
business end. If you buy one, do yourself a favor, pop the hood,
and look at how well-made the battery housing is inside. OOohhhhh....
The LaserMax projects a gorgeous reticle pattern onto the wall, and
more importantly, back onto the face of the laser itself, allowing
you to make incredibly detailed and accurate adjustments. All other
lasers simply project the dot back into the laser's base, and it's
easy to lose the dot in the glare of the outgoing beam. With the
LaserMax, you get a nice illuminated pattern underneath your
focuser. The direction of the correct adjustment becomes obvious.
Rugged, and very accurate: Howie Glatter's lasers
I obtained one of each as review samples from Howie himself. These
collimators are activated by turning the hefty, stainless steel bolt
on top of the unit, which makes contact with an expensive CR123
battery inside the housing. Some thought that the use of the CR123
was a disadvantage compared to the others, which use plain AA batter-
ies. Luckily, prices on these CR123s have been dropping steadily over
the past few years.
The LaserMax is a beautifully-made collimator with a serious-looking
warning label on the side of the housing. In contrast to the rugged
but somewhat homemade look of Glatter's units, the LaserMax is the
most refined-looking collimator I've ever seen. There's a red push
button on the top, a yellow LED indicator, and a lens cap for the
business end. If you buy one, do yourself a favor, pop the hood,
and look at how well-made the battery housing is inside. OOohhhhh....
The LaserMax projects a gorgeous reticle pattern onto the wall, and
more importantly, back onto the face of the laser itself, allowing
you to make incredibly detailed and accurate adjustments. All other
lasers simply project the dot back into the laser's base, and it's
easy to lose the dot in the glare of the outgoing beam. With the
LaserMax, you get a nice illuminated pattern underneath your
focuser. The direction of the correct adjustment becomes obvious.
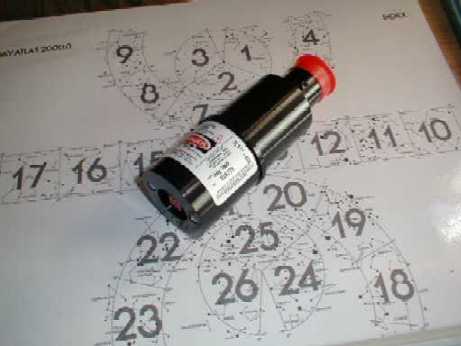 A beauty: The LaserMax
LaserMax also sells a separate clip-on device that turns any laser
into a holographic unit. I didn't have one handy for review.
Finally, I added my cheap laser collimator that I bought for $45 from
Bill Vorce at the Telescope Warehouse. It's basically a mini-penlight
laser (like the kind you see down at the local drug store) mounted
in a fixed body that slips into your focuser. It's powered by three
LR44 button cells that don't last long enough.
And the Winner Is...
...All of them, to some degree. What became obvious as time went on
is that a laser -any laser- is better than none. There was virtually no
instance in which a laser (even the inexpensive Telescope Warehouse
unit) could not improve upon a collimation done using a traditional sight
tube.
Then there's the human comfort factor. A laser frees the user from having
to crouch down and squint through a tiny hole. You can walk around your
scope and check things out from different angles. This factor alone is
enough, in my book, to warrant the purchase of a laser collimator.
Things got even better as we went up the food chain. The Astro Systems
unit also achieved excellent collimation, but the mechanical tolerances
are much tighter. The collimator fit more precisely in the focuser,
leaving little doubt as to the "correct" alignment between collimator
and drawtube. Ditto for the 1.25" unit from Howie Glatter. In contrast,
the Telescope Warehouse unit had a tiny bit of slop and "wiggle" while
in the drawtube.
Finally, there's the holographic units. Just as a "dot" style laser can
virtually always improve upon sight-tube methods, these holographic units
(the LaserMax and Glatter's 2" unit) allow you to fine-tune your collimation
even further. Although the "dot" style collimators can be just as accurate,
the holographic units are much easier to use and you arrive at the correct
collimation point a lot more quickly.
These holographic lasers not only assist in adjusting tilt of the two
mirrors in a Newtonian optical system (the most common use for these
devices) they can help you center your secondary mirror, a task that,
until now, was an approximate one at best. You just look at the
reticle pattern inside the tube opposite the focuser.
I should mention at this point that using one of these holographic
style collimators demands that you square-on your focuser and center
your secondary very precisely, which can be tedious process. If you're
not willing to do this, you're wasting your money. However, once your
focuser and secondary are correctly positioned (you did remember
to offset the secondary, right?) collimation can be routinely done by
adjusting only the primary mirror. This is less of an issue with the
"dot" style collimators, but having all the parts of your telescope
squared-on is always a good idea.
Finally, it helps to have a telescope with high-quality parts if you
plan on using a hologram-style collimator. If there's play in your
focuser or if your primary has a cheap, sticky mirror cell, there's
little point in buying a collimator this precise.
A beauty: The LaserMax
LaserMax also sells a separate clip-on device that turns any laser
into a holographic unit. I didn't have one handy for review.
Finally, I added my cheap laser collimator that I bought for $45 from
Bill Vorce at the Telescope Warehouse. It's basically a mini-penlight
laser (like the kind you see down at the local drug store) mounted
in a fixed body that slips into your focuser. It's powered by three
LR44 button cells that don't last long enough.
And the Winner Is...
...All of them, to some degree. What became obvious as time went on
is that a laser -any laser- is better than none. There was virtually no
instance in which a laser (even the inexpensive Telescope Warehouse
unit) could not improve upon a collimation done using a traditional sight
tube.
Then there's the human comfort factor. A laser frees the user from having
to crouch down and squint through a tiny hole. You can walk around your
scope and check things out from different angles. This factor alone is
enough, in my book, to warrant the purchase of a laser collimator.
Things got even better as we went up the food chain. The Astro Systems
unit also achieved excellent collimation, but the mechanical tolerances
are much tighter. The collimator fit more precisely in the focuser,
leaving little doubt as to the "correct" alignment between collimator
and drawtube. Ditto for the 1.25" unit from Howie Glatter. In contrast,
the Telescope Warehouse unit had a tiny bit of slop and "wiggle" while
in the drawtube.
Finally, there's the holographic units. Just as a "dot" style laser can
virtually always improve upon sight-tube methods, these holographic units
(the LaserMax and Glatter's 2" unit) allow you to fine-tune your collimation
even further. Although the "dot" style collimators can be just as accurate,
the holographic units are much easier to use and you arrive at the correct
collimation point a lot more quickly.
These holographic lasers not only assist in adjusting tilt of the two
mirrors in a Newtonian optical system (the most common use for these
devices) they can help you center your secondary mirror, a task that,
until now, was an approximate one at best. You just look at the
reticle pattern inside the tube opposite the focuser.
I should mention at this point that using one of these holographic
style collimators demands that you square-on your focuser and center
your secondary very precisely, which can be tedious process. If you're
not willing to do this, you're wasting your money. However, once your
focuser and secondary are correctly positioned (you did remember
to offset the secondary, right?) collimation can be routinely done by
adjusting only the primary mirror. This is less of an issue with the
"dot" style collimators, but having all the parts of your telescope
squared-on is always a good idea.
Finally, it helps to have a telescope with high-quality parts if you
plan on using a hologram-style collimator. If there's play in your
focuser or if your primary has a cheap, sticky mirror cell, there's
little point in buying a collimator this precise.
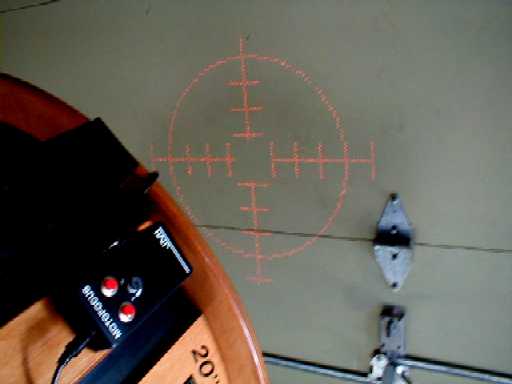 Is this cool or what?
Both the holographic units performed excellently, but there are some
differences. First and foremost, the LaserMax is a lot brighter. I
found that I could not project an image in my closed garage on a
partly sunny day with Glatter's unit. The LaserMax, however, is
bright enough to do this. If you collimate a lot in the day time,
this could be an issue for you.
Also, the LaserMax's holographic image is a little more precise, with
many more tick marks that one can use for measurements. It also
projects the tick marks back onto the face of the collimator itself,
which allows for some really fine tuning. Glatter's unit projects a
simple grid pattern.
On the other hand, Glatter's 2" unit seems to have better mechanical
tolerances. It fits tightly (almost too tightly) in the drawtube, which is
a good thing. There is no slop or play whatsoever. I found with the
LaserMax, that in certain focusers, that there is a tiny, tiny bit of
play under certain conditions.
The lens that generates and disperses the hologram pattern on both the
LaserMax and Glatter's unit is removable, turning them back into "dot"
style collimators. On Glatter's unit, removing the pattern generator
is said to brighten the dot considerably. Fearing for the repeatability
of mechanical tolerances, I didn't try removing either (Glatter says the
integrity of his unit's beam coincidence will be preserved when the grid
generator is removed and/or replaced.)
In the end, one observer favored the LaserMax, which he wound up
buying. I'm seduced by the beauty of the LaserMax's bright reticle
pattern, but in practice I achieved the same results using Glatter's
unit, which fits more snugly, is smaller, and a bit cheaper.
Conclusion:
I think anyone who owns a Newtonian should own a laser collimator of
some kind. I found as the week wore on that the "dot" style collimators
were accurate enough to provide pinpoint images in the 20" Obsession.
If I felt like it, or had some extra time, I'd throw in one of the holographic
units and do a really precise collimation.
However, that's me. Each individual has his own tolerance for errors
in collimation. I know one person who won't even think about observing
until his optics is perfectly (and I mean perfectly) aligned. If this sounds
like you, then go for one of the holographic units. If you're the type that's
content with merely excellent alignment, a "dot" style unit may be good
enough for you.
One final note. Collimators are a bit like telescopes. They're only
as good as the person using them. Having a fancy laser is not a sub-
stitute for a thorough, working knowledge of collimation techniques.
I have seen more than one observer show up with a laser at an ob-
serving session, with no idea how to operate it. Please don't be
one of them.
During the week I had these devices, my tolerance for miscollimated
optics dropped dramatically. Also, many of the Newtonians within driving
distance of my home received a fresh, accurate collimation. That's a good
thing.
Is this cool or what?
Both the holographic units performed excellently, but there are some
differences. First and foremost, the LaserMax is a lot brighter. I
found that I could not project an image in my closed garage on a
partly sunny day with Glatter's unit. The LaserMax, however, is
bright enough to do this. If you collimate a lot in the day time,
this could be an issue for you.
Also, the LaserMax's holographic image is a little more precise, with
many more tick marks that one can use for measurements. It also
projects the tick marks back onto the face of the collimator itself,
which allows for some really fine tuning. Glatter's unit projects a
simple grid pattern.
On the other hand, Glatter's 2" unit seems to have better mechanical
tolerances. It fits tightly (almost too tightly) in the drawtube, which is
a good thing. There is no slop or play whatsoever. I found with the
LaserMax, that in certain focusers, that there is a tiny, tiny bit of
play under certain conditions.
The lens that generates and disperses the hologram pattern on both the
LaserMax and Glatter's unit is removable, turning them back into "dot"
style collimators. On Glatter's unit, removing the pattern generator
is said to brighten the dot considerably. Fearing for the repeatability
of mechanical tolerances, I didn't try removing either (Glatter says the
integrity of his unit's beam coincidence will be preserved when the grid
generator is removed and/or replaced.)
In the end, one observer favored the LaserMax, which he wound up
buying. I'm seduced by the beauty of the LaserMax's bright reticle
pattern, but in practice I achieved the same results using Glatter's
unit, which fits more snugly, is smaller, and a bit cheaper.
Conclusion:
I think anyone who owns a Newtonian should own a laser collimator of
some kind. I found as the week wore on that the "dot" style collimators
were accurate enough to provide pinpoint images in the 20" Obsession.
If I felt like it, or had some extra time, I'd throw in one of the holographic
units and do a really precise collimation.
However, that's me. Each individual has his own tolerance for errors
in collimation. I know one person who won't even think about observing
until his optics is perfectly (and I mean perfectly) aligned. If this sounds
like you, then go for one of the holographic units. If you're the type that's
content with merely excellent alignment, a "dot" style unit may be good
enough for you.
One final note. Collimators are a bit like telescopes. They're only
as good as the person using them. Having a fancy laser is not a sub-
stitute for a thorough, working knowledge of collimation techniques.
I have seen more than one observer show up with a laser at an ob-
serving session, with no idea how to operate it. Please don't be
one of them.
During the week I had these devices, my tolerance for miscollimated
optics dropped dramatically. Also, many of the Newtonians within driving
distance of my home received a fresh, accurate collimation. That's a good
thing.
Links to Manufacturers:
Astro Systems
Howie Glatter's Laser Collimators
LaserMax
The Telescope Warehouse
End Page 5
Back to Home Page